Resources
Webinars
Basics of Butt Fusion
Watch a step-by-step butt fusion demo guided by ISCO field experts. We answer all of your questions about butt fusion, standards, guidelines, and training. It’s the most foundational element of building an HDPE piping system. This is your chance to see the full fusion, start to finish.
From facing to cooling, we’ll cover it all. Clean It, Shave It, Heat It, Fuse It.
We’ll cover:
- Step-by-step process
- Standards and guidelines
- Life span and cost
- Environmental impact
Will Vodak
I need some help with everything. So they called in the backup. The big guns the first big gun plane injured. My friend, my co host, Mr. Garry Bouvet. Garry, how you doing today? Well,
Garry
always good to be here, man. It’s another warm day here in the city of Louisville. And I’m excited talking about fusion. I mean, it is one of the key aspects that make HDP such a great product to choose. So I’m really ready to dive into this today. This is
Will Vodak
something that Garry wakes up every morning and just wants to talk about fusion. So Garry, for those that don’t know yet find it hard to believe anybody doesn’t know you. But who are you? And why should people listen to you? Well, I
Garry
am a project manager here at ISCO industries. That’s kind of a broad term, I get involved in a lot of different things. I’ve talked about HDPE and fusion all across the world. And for over 25 years here at ISCO will so been doing it a long time. I’m always excited about talking about it. So ready to get moving. Fantastic.
Will Vodak
And even Garry needs some help from time to time. So we brought in our real specialist in this. Eric ray with us from one of our yards out in Louisville, Kentucky. Eric, how you doing out there? Can you hear me? We’ve got Eric muted. I’m wondering if someone can over at the river port yard could unmute Eric’s microphone so we could get him. Get him going. There we go, Eric. Let’s try this again. Second time. How you doing my friend?
Eric Ray
Hey, Garry. Well, how are you guys? I’m doing great. Hello, everyone.
Will Vodak
So we chose Eric for this not only because he looks like Bradley Cooper. But he also has the experience to walk us through this fusion demo in full. Eric, why don’t you give us a little bit of your bio and background in this industry. And I always ask the question, why should people listen to you today?
Eric Ray
Yeah, so I’ve been with ISCO about six and a half years. I’m a maintenance manager I over the rental and refurb here in Louisville and in Huntsville, Alabama. We work on fusion equipment.
Will Vodak
You deal with this equipment. Tell us a little bit about what the what the fusion equipment is behind you. Is there a is there a name for that particular beauty back there?
Eric Ray
Oh, yes. Well, this is Margaret see, and Margaret’s in a great mood today.
Will Vodak
We’re excited, Eric to to get this going. So let’s let’s kind of just start this off. Eric, I think you guys are going to actually show us kind of start to finish. The goal of this really, is to show a fusion from the very beginning through the very end. So Eric, do you want to maybe start us off and tell us a little bit about loading that pipe itself, and things that you look for when starting off a fusion?
Eric Ray
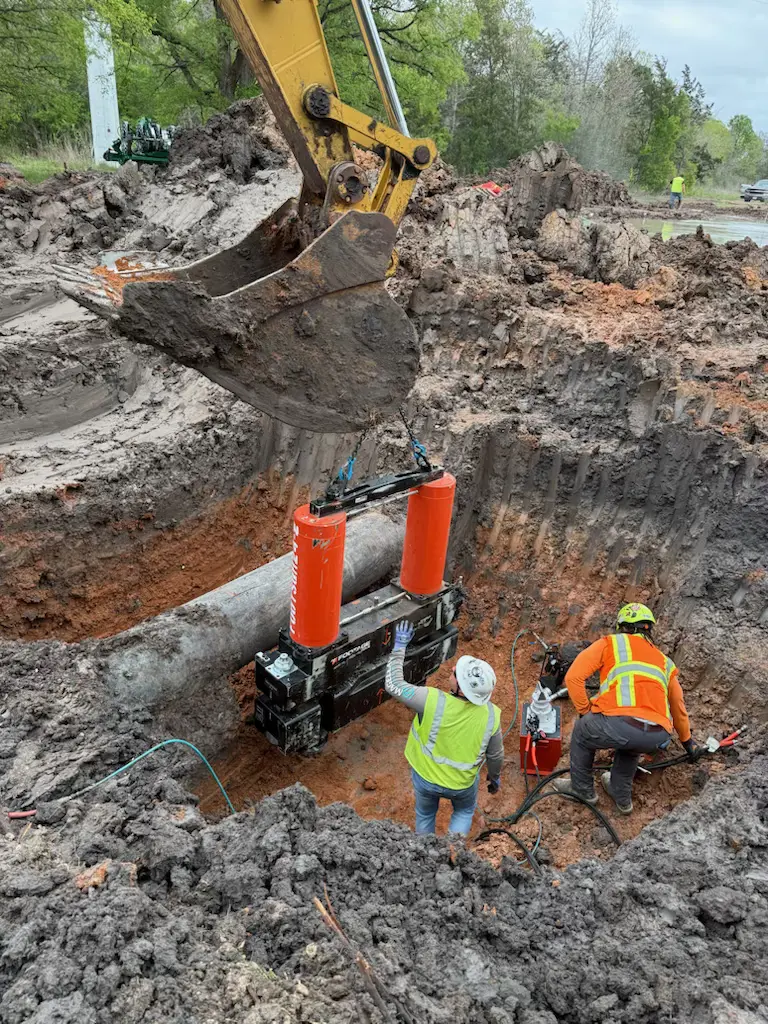
Sure. So today we’re working with 12 inch pipe, Dr. 17. We’ve got a 40 foot section loaded into the fixed side of the machine, what we’re gonna do, we’ve got a piece of pipe sling, another 40 foot piece of 12 inch Dr. 17. So we’ve got a sling, and we’ve got a man with a tech line on the opposite end. And we’re gonna be loading this into the machine to make a joint today.
Will Vodak
Fantastic. Well, once you guys go ahead and start that process, as you do, Garry and I are going to talk a little bit about fusion in general, namely, what is fusion? So there are maybe if we could get the full picture of the fusion going, we’ll talk a little bit about fusion Garry them. First off, what is fusion? And why is it so important to what we do here at ISCO? Well,
Garry
I mean, you know, fusion on the true definition, you look up in Webster’s Dictionary? Well, I don’t know if you’ve used one of those recently. But you can go in there and find the meanings of words. And fusion is the occurrence involving producing or production of a union. It’s also the state of being combined into one body, or the act of melting together well, kind of, we’re encompassing all three of those into this process of joining HDPE pipe.
Will Vodak
And the reason we’re doing that Garry is to create a monolithic, so we’re constantly getting this question is, well, how do you join it? We join it via fusion and then after we do that, that thing’s not coming apart. Correct?
Garry
Exactly. Exactly. Fusion is you know, we’re making two pieces, and basically creating one we’re taking those two pieces that we’re fusing together and it’s becomes one piece of pipe and it functions as one piece of pipe. And if we do that over at that On foot, it’s 1000 foot piece of pipe, essentially not a
Will Vodak
bunch of separate pipes, if you will. So Garry talked to me about what the principle of heat fusion is. We’ve kind of touched on what fusion is. But what about heat fusion for polyethylene specific, right?
Garry
So the fusion process for polyethylene involves two key felt key elements heat and pressure. And so that heat is necessary to to melt the ends of the pipe. And then the pressure is necessary to interlock those molecules of those two separate pieces into one continuous piece of pipe.
Will Vodak
So essentially, is there any difference between that molecularly between that one between the two different pieces of pipe coming together,
Garry
there’s no difference between those two stationary now we alter that molecular structure will when we apply the heat to it, so we take it from a very Crystaline state, which is solid into a very amorosa state or molten state where the molecules and everything are very pliable and flexible, right.
Will Vodak
And, Garry, one last thing, obviously, you need a combination of pressure to be able to make that joint, right, right. If you just bring two heated pipes together and kind of just touch them together, it’s probably not going to do much. But in order to make that fusion, you really need some pressure from that as well, right.
Garry
And that pressure is predetermined by the size in der of the pipe. So that pressure is going to change based upon the size of pipe that you’re doing
Will Vodak
heat pressure and time. Garry, speaking of time, it looks like Eric just completed that while we were talking a little bit about fusion, Eric, you seem to do that really safely. That’s obviously the key here, anything that you recommend, from a safety element that’s going to be in the back in the front of our minds all day long. But I noticed you guys are using some taglines there as well.
Eric Ray
Yeah, sir. So it’s important to keep your hands clear of any pits points when the pipes coming in, you know, it could be swinging, so you want to never put yourself between the pipe and any other objects. So you want to protect the machine, you want to lift the pipe high enough to clear the cowlings and all those important components that we’re going to be using here, and keep those hands free. If you’ve got to touch the pipe, touch the pipe, but not on the ends, you don’t want to get your hand pinched in there between the jar between the other pieces of pipe.
Will Vodak
And Eric, you had some help as well, is it always a good idea to have multiple guys taking a look at at things from different angles to make sure everyone’s safe?
Eric Ray
Yes, sir. So on the opposite end of the pipe, we had a tag line, which is basically a length of rope or anything that you can find to be able to when that pipes strong in the air. When other objects if it does bump anything, it can get out of hand. So you want to make sure that you have some control, at least on one end of the pipe, and then the operator being myself, I can control the pipe coming into the machine on mine.
Will Vodak
So Eric, we’re gonna let you get into position for this fusion, I think we got to get some close up shots at while we’re talking about that, Garry, but fusion is or will lead an era kind of get set up. But fusion is a step by step process. So really, combination of these seven steps will make a successful, but fusion it’s so easy, even someone like myself can do it. So you want to maybe go over these steps as a whole, just just very briefly naming them what we’re looking for. And then we’re gonna go in step by step with with Eric got out in the field, right,
Garry
so we’ve got the clamping part. So he’s loaded the pipe in it look like well, he already had the pipe clamp down so that that’s step one. And that clamping is just to secure the pipe safely, so it doesn’t move while we’re doing the actual fusion steps. Then the second one is alignment, you know, checking his high low on his pipe, then we’ve got facing, where we’re squaring the ends of the pipe, then we’ve got heating, which we’re melting the pipe ends with the heater, and then joining the pipe, which is utilizing the pressures that we talked about earlier, pushing enough to molten ends together. And then cooling them and then inspection. So those seven steps are the same whether you’re doing a half inch pipe, or 65 inch pipe, the steps are the same. The only thing that changes will is the mechanics of the equipment.
Will Vodak
So it looks like Eric is starting this Eric, can you hear me out there?
Eric Ray
Yes, sir. So getting ready. I’m prepping the pipe to be phased off. So Garry, can you hear me? Yes, we
Will Vodak
certainly can. I think you’re a little bit ahead of us, but that’s okay. We’ll catch up to you. Garry, you want to talk a little bit of what we’re Going at this Eric Eric, clamp that pipe beforehand that using some of those hydraulic controls there? Yes,
Garry
absolutely, he’s got a hydraulic clamping kit on the on those jobs. So that really makes it a very efficient quick process. Other machines are manual tightening of of each of those clamp knobs. But in this particular case, he’s just simply clamp that pipe that holds it in place while he does the other fusion processes. He’s got the facer in there now we’ll so he’s he’s already getting ready to do that facing this process is necessary to square the pipe and remove any oxidation layer that’s on the pipe, getting down to that virgin polyethylene, which really helps with heat penetration when we’re ready to put the heater in. So
Will Vodak
but before we face, Garry, we’re going to check some alignment on those pipes and make sure that everything is coming together. Eric, can you show us what that would look like to maybe bring those pipe ends together? Check for high low. And just to make sure that clamping was was was done correctly. I think you’re also going to look for some slippage there so that when you bring those pipe ends together, you’re not going to have the jaws maybe slip out a line.
Eric Ray
Yeah, absolutely. So right now, I’m, I’m also setting my direct pressure on what it’s going to take to move this pipe. So and then we’ll bring the pipe together, check the alignment.
Garry
Yeah. So that drag that he’s doing well is really important. Particularly if you’re doing tie in welds, you’ve got long strings of pipe out on each end, and you’re trying to move that pipe together, you have that pressure, there’s a lot of load on those jobs. So we have to add in compensate for that into our pressure settings and so forth. So he’s doing that drag calculation check right now.
Will Vodak
And that’s just the amount of force it’s going to take for that pipe end to move. So it doesn’t creep away. Exactly. Right. Right. Exactly. So Eric, how’s that alignment? Looking to you? I noticed you were you were you’re you’re checking that out for about up to 10% of the wall thickness. Does that look pretty even to you?
Eric Ray
Yes, absolutely. We’re looking good. We’re within that 10% For sure.
Will Vodak
You know, Eric, if there was a little bit of a high side, you Garry tighten down that high side rather than loosen up the the opposing side, correct? Absolutely.
Eric Ray
Go ahead, Eric. So your inner Jaws, I have an okay, sorry about that. The inner jaws have an adjustable clamping cylinder, where your inner Joes are for height adjustment, your outer clamping is more for gripping the pipe. So if you do have an offset, or a height adjustment that’s needed, you can do that with either side of the inner clamp cylinder.
Will Vodak
So Edgar is asking a really good question, What do you mean by 10% of the wall thickness. So Garry, what we mean by that is 10% of the interfacial area of that pipe, really. So it’s let’s say the pipe thickness is, is one inch, you’re looking at 10% of one inch for higher level
Garry
high load that you can be off, you know, that doesn’t have to be perfectly aligned. So a 10th of an inch right is what we’d be looking at, in that case will with a with a one inch wall thickness.
Will Vodak
Keep the questions common Edgar, we appreciate him. Bear. Let’s go back to what Eric is checking out. So now we’re going to go into this kind of next phase, once we have aligned this pipe, which is what Eric, what’s the next step here?
Eric Ray
Yeah, so now that we know our drag pressure, we’ll need to calculate based off of our 12 inch pipe. Dr. 17. Garry, what’s going to be our calculation if our direct pressure is 60 psi
Garry
60 Psi, you’re going to your Fusion pressure is going to be at 443.
Will Vodak
And for our audience Guaran. Math in his head. He doesn’t know he knows a lot, but he doesn’t know the actual drag pressure of every single size range. But Garry, tell us a lot about that mechanic. And yeah, I
Garry
mean, so as with anything well, right, everything’s got an app for it. There’s an app for being able to calculate your Fusion pressures. And I happen to have that on my phone. And I’ve plugged in the information that Eric has shared with me about the pipe size, the Dr. chosen the right machine that he’s working with today. And we’ve calculated all that up. The standard fusion pressure for that size of pipe is 383. And then when he adds that drag to it, that’s where we have the 443
Will Vodak
If the audience can see there, it looks like an iPad connected to that machine. Eric is using what’s called the data logger. That data logger is connecting into the machine. And it’s reading in real time the psi output that the force is that that machine is giving. So Eric is dialing in all three of those selector valves to the appropriate pressure right now, Garry, yeah,
Garry
incorporating the drag that he had on there will. So
Will Vodak
Eric, it looks like all your, your your pressures are set? I think we’re moving on to facing the pipe. Is that the next step?
Eric Ray
Yes, sir, we’re ready to face up some pipe. So while Eric’s doing that, we’re gonna switch our selector valve.
Will Vodak
Go ahead, Eric.
Eric Ray
So we’re gonna switch our selector bout to facing pressure. Now, don’t forget that there’s drag pressure. So we’re gonna need at least that 60 psi to drag this piece of pipe. But you want to face under the the lowest possible setting? You got to remove on its own?
Will Vodak
Yeah. What what Eric is talking about is facing off. And Garry, let’s back up a little bit. Why are we facing pipe? I mean, people might say, well, this is, this seems crazy, we’re taking pipe off. But there’s a good reason for that.
Garry
It’s, you know, we’re getting we’re removing that oxidation layer, we’ll getting down to the clean virgin polyethylene. But we’re also squaring both ends, because that facer has blades on both sides. So it squares the two ends together. So when they come together against the heater or against each other, when we’re doing the fusion, they’re perfectly lined up, and they’re gonna meet up properly.
Will Vodak
So you’ll notice Eric is sorry, Eric, I know you’ve got a hard scene, but keep going man.
Eric Ray
So we’ve got our face are in and keep in mind, your drag pressure was 60 psi. So you’re going to need 60 psi to drag the pipe. But to face off the pipe, you want to face at the lowest possible pressure, be sure that the selector valve is in facing pressure position. So it’s going to be all the way up. And we’re going to close the gap, we’re going to bring the pipe ends together against the facer. And until it’s the pipe reaches the phasor. There, we’re going to turn the phaser on and let Margaret go to work. You might have to slightly increase the pressure once it starts facing, but you just gradually want to increase that pressure. nothing drastic. Inside that phaser is a sprocket and chain driven by a hydraulic motor. So you only want to increase enough pressure until you start seeing a full ribbon.
Garry
Well, there’s a there’s what we call facer stops on the machine in the face. And we won there’s a gap right now between those facer stops, and the and those jobs. And we want to take that gap out that ensures that that facing is done squarely both ends are squared up properly, and the facing is completed.
Will Vodak
So we’re taking off some ribbons here. The reason we’re doing that at low pressures, and it’s really important, by the way from a safety element to turn that face are off before you stick your hands in there. Excellent. And get those ribbons out. I don’t know Can we zoom in on on that on that pipe wall to see how essentially smooth shiny and square that is once we’re complete. But essentially we are taking off this to make sure that we’re getting the best form of into that area. So we’ve got a couple of questions here, Garry, talking Solomon’s asking, Is this facing done for all sizes of plastic pipes or just large plastic pipes? It’s
Garry
a great question. It is it is a key component for any fusion regardless of size. We’re always going to face the ends of the pipe off they’ve been exposed. They’ve been outside. We want to get good heat penetration and get a good Fusion bottom. We always have to prep that pipe by facing the ends. Mike’s
Will Vodak
also asking how much pipe do you live Do you leave sticking out past the pipe jaws?
Garry
Oh, that’s going to vary Mike by job to job and depending on the condition on the ends of the pipe. Very commonly we want about a thumbs width away from the job of pipe protruding in but if you’ve cut that pipe by Say with a chainsaw or some other thing where the cuts are not necessarily square in uniform, or the pipe has been damaged a little bit nicked up, something’s hit against it, we’re going to have to take off more to make sure we take out any of that, that damage on the end of the pipe and get down to the clean full face of that pipe.
Will Vodak
And Garry, my good friend Wade is asking assuming the pipe ends are relatively square how many mills are removed during that facing process.
Garry
Boy, each each ribbon is about a 32nd of pipe 1/32. That’s how much we trim off. We’ve I’ve had jobs where I’ve had, I’ve had to take off, you know, quarter of an inch, half an inch in some cases, to begin, depending on damage gouging on the end of the pipe that I’ve got to remove before I can do my fusion. So it really is going to vary from each particular job. But if this pipe is coming from the plant, it’s got nice clean cut, and we’re not taking very much off, we’re taking off less than a quarter of an inch of
Will Vodak
pipe. And now looking at that pipe, it is perfectly seated. Eric, you’ve done a great job facing that. I see no gaps, no light coming through those pipe ends. It looks so good. It’s almost like Garry did it. So Eric, you know, now we’ve now that we’ve faced the pipe. The next step really is to what I think that’s checking our heater plate, isn’t it?
Eric Ray
Yes, sir. No, sir. So we got our heater temperature set, we’re going to check that and confirm our temperatures don’t good. So that’s a parameter,
don’t put your finger on that.
So we don’t have any eggs or pancakes to put on here. So we’re gonna check this down just a bit. We’re gonna check our heater temperature. And what we’re looking for is between 404 50. So we’re over 400. And you want to check it at multiple points, generally 12 o’clock, at six o’clock, three o’clock, and nine o’clock on both sides confirm that your temperatures are good. And we are good cooking at about 403 between 403 and 420.
Will Vodak
So Garry, what is the and something we were going to mention here in a bit is this is all guided and governed by the ASTM F 2620. What is the 2620 documents say about heater temperatures and temperatures that were allowed to refuse?
Garry Bouvet
Well, that heater temperature. So you know, they have that range of 400 to 450. The optimum target that we’re always looking for is around 425. But successful fusion polyethylene has a high, you know, variability with it. So we’ve got that range of 50 degrees that we can work with in terms of heat or temperature.
Will Vodak
So Eric has gone ahead and begun that fusion process. So we are now heating this pipe up. So Eric brought all that pipe together under a brief amount of pressure. And there you just saw what’s called the shift sequence. Garry, do you want to talk more about that shift sequence, it always seems to mess me up. But it’s not too hard to do. Yeah,
Garry Bouvet
the CFC clamps on any of these hydraulic machines, right, you have to bring that, that pipe in that movable jaw against that heater, and you have to bring those in contact. So something’s got to move, we got to have pressure to move it. Once we bring that into contact. Depending on the size of pipe that we’re working with, we may do that shift sequence immediately, or we may have to do it. After a little bit of time, we want to wait. As our sizes get bigger, well, we want to wait make sure that we’ve started to see a melt forming on the pipes that we’ve got good contact with that here all the way around, then we would then drop our pressure. So again, those steps vary slightly depending on size of pipe. But that shifts sequence what we’re doing is we’re getting all of the pressure out of the cylinder so that while that heater is against that pipe, it’s under no pressure, it’s just contact against the pipe ends.
Will Vodak
So Eric, you’ve used that data logger as see to start your Fusion. What is the data logger saying and keeping you on track for either the time or the bead size that you need to reach?
Eric Ray
Right so 12 inch pipe you’re really looking more for beat size. And what it’s showing me is I’m going to need a quarter inch of a bead melt on both sides of the heater so looking for a quarter read speed melt on the fixed side and a quarter inch speed melt on the movable side. So once we’ve flipped to neutral, we’re now back to our drag pressure. So we’re at that 60 psi to drag the pipe, then we shift to neutral this way the pipes not applying pressure to the heater, but it’s not trying to float away either.
Yep, and that, that melt time, he said he gave you a bead size. But we also referenced the ASTM standard will. And it says four and a half minutes per one inch of wall thickness is our melt our minimum melt time. So depending on weather conditions, sometimes we have to go longer than the prescribed time because we got to get to that proper melt bead size. So we’re looking at both of those things will minimum of four and a half minutes per inch of wall thickness of pipe and the bead size of a quarter inch and he’s looking for.
Will Vodak
So this next step our audience, I’m going to tell you, it’s going to go pretty quickly. Really, really the next step, and that’s why we’re going to we’re going to jump ahead here to wall Eric’s watching that plastic melt. We’re talking about joining the pipe itself. So Garry, what’s going to happen here, I imagine he’s going to remove the phasers or remove the heater, check the ends to make sure that there’s it wasn’t heated under pressure. And then they’re gonna bring those pipe bands together after a move. Yeah,
it’s all going to be very quick as you indicated will, he’s going to, before he gets ready to pull that heater out, he’s going to shift down into Fusion pressure, because that’s our next step. Plus, that’s going to give us the maximum pressure to open that jaw quickly. He’s going to open that jaw, the heater is going to be removed, and he’s going to put it back into forward he’s gonna bring those pipe ends together while he’s looking at the melt and form the formation of that melt, as you said, to make sure that it’s been properly done without any pressure. Eric, are
Will Vodak
you staying hydrated out there? Are you sure you’re up for this?
Eric Ray
I’m staying hydrated, sir. They’ve got a cooler out here. I won’t talk about everything that’s in it, but have their water in there.
Will Vodak
So Eric, you’re probably looking at right now between that kind of that 90 degree area between the pipe and the heater? Are you seeing that pipe grow at all I know it’s really hard for the camera to get in there. But you can probably see that we are close.
Eric Ray
Yeah, we are working right now I would say we have about a 16th of an inch of a bead that starting to roll up on each side. So we’re just going to continue to monitor that. And when we get to around a quarter inch bead, and like Garry mentioned, we’re talking about four and a half minutes roughly. So I’ve got an eye on the timer. But also we’re it’s important that we’ve got a quarter inch speed there as well. So great.
Will Vodak
Well, while you’re waiting for that, we’re going to take a couple questions here to Nash is asking Garry This is 400 to 450 degrees Fahrenheit, correct? Yes, rapid fire Dinesh thank you for good question. Edgar, is the heater plate temperature temperature typically checked manually? Like Eric just did? Or can the machine record that in the data logger? Great question at your.
Garry
So you will input the information into the data logger. But he has to do the manual check with a parameter. And here there’s
Will Vodak
oftentimes a little temperature gauge on that heater plate, we really recommend taking a contact hydrometer and infrared hydrometer. Manually checking that as sometimes that reading can be a little bit off.
Garry
Well the gauge that the temp thermometer that’s on the heater will that you indicated references internal temperature. So when you’ve got wind conditions, different temperature elements, it can, it can reduce that temperature. So we want the surface area to be checked to that’s what’s contacting the pipe. My favorite
Will Vodak
person here today the anonymous attendee is asking how to determine face off operation is functioning perfectly. Is there any rule of thumb like after after this much diameter of face off, it has to be checked? I think we mentioned that where if you’re getting full ribbons removed from that pipe wall, then the face off procedure is working as it should. You want to really rule of thumb there is if you’re only getting a little bit of ribbons or shavings coming off from time to time, there’s probably something wrong with either the face or blades or the the face or itself. But if you’re getting full ribbons, and you’re facing all the way back to the stops, that’s a good sign thing, right?
Garry
Absolutely. If your your cuts have to be square, right because you’re squaring that pipe. So if you’re only getting partial ribbons initially, it could just be that you had an angle, the miter cut on that pipe in will and they’re not contacting all lay around the facial blade yet.
Will Vodak
Eric, I’ve got a question for you. Brian is asking, is there temporary power required for this unit? Do you want to talk about how this particular unit is powered?
Eric Ray
Yeah, so this particular unit is a McElroy truck start 500, it’s a series three, it’s powered by a Kubota diesel engine, it’s a three cylinder. And on the it’s basically a direct shaft driven generator and hydraulic pump, the generator being on the front side of the engine, and the hydraulic pump being on the rear side. So this unit is self contained, you can track it anywhere, and it’s gonna be able to provide the electricity, the current that the heater needs to heat up, and also the hydro power to run the carriage as well as the track vehicle itself, and the face or motor.
Will Vodak
So all of these units are going to be a little bit different in their operation. I think that’s where, you know, anybody interested in learning about the fusion process can reach out to the ISCO, person, salesperson nearest to them, and we’ll be able to walk you through the many different types of equipment that are out there for you to be able to fuse. Eric, are you are you getting ready to make this joint?
Eric Ray
Yeah, I was getting ready to jump in there, we’ve got about a quarter inch speed, we’re sitting at just under five minutes. So we’re gonna go ahead and shift into Fusion pressure. Now we only have a few seconds to get this done. So we’re going to shift in the fusion pressure, we’re going to open the carriage index the heater over, open the heater, get that heater out of the way, and then close it under fusion pressure. And there we have it.
Will Vodak
So as I said, that occurred in pretty rapid fire succession, Garry, but what are we looking at here, now it looks like there’s a bead formed on the pipe is that the case, so
Garry
you had two molten ends? Well, from that heater, right, and you’ve now put those under for a little over 400 PSI of pressure. And you’ve pushed those two together. So you’ve got what we call a double roll back, right, you’ve got both of those molten beads that have pushed and combined together, and it will also roll back under pressure. And so what that did is took those molecules and the molecular structure of polyethylene is very much like a chain. And so you’ve now taken all those different links of the chain, and you’ve mixed them all together under this pressure. And now what you have is and you’re holding that pressure, until it cools, that cooling process is about 11 minutes per inch of wall thickness per the ASTM standard. So at a minimum, we’re going to hold that for a little round 11 minutes.
Will Vodak
So this is my favorite part in doing these demonstrations. Because this is about as fun as watching paint dry here. Yep. Can we have the camera go back to that data logger. If possible, there was a great shot of the data logger and the graph that was that we were witnessing. So if everyone can see this under the glare is out there. This is a great representation of why we’re such big advocates of using the data logger. Because the data logger can can tell Garry, if Eric is going to do this fusion correctly. at a at a minimum. Garry, what are you seeing here? If you were to look at this report? Would you say that this was done by someone who’s trained experience and know what they’re doing? Yeah,
Garry
that’s it’s pretty hard to see, as you said, Well, I think we’ve actually got a slide of a graph representation of a fusion in our presentation. And that really does, I could look at that and know if somebody followed the right procedures. Now, I want to make it clear that data logger doesn’t mean that you’ve got a perfect join. Because if somebody used an oily rag and wipe the pipe ends before he put the heater in there, the data logger is not going to see that. So this unlimited data logger eliminates, you know, operator air in terms of pressures times for both heating and cooling. But it doesn’t, you know, it doesn’t. It’s not 100% foolproof.
Will Vodak
We’ve got a couple questions here, Carrie, but before we do that, I’d like to take this opportunity to ask our first poll question of the day, which is have you ever participated in fusions or certification training? Yes, your cert is up to date. Yes, but it’s expired. No, you want to get certified No, you have no need to get on by Garry I believe my card has expired if your card current right now
Garry
I actually I don’t think mine is current will buy probably need to actually go through that again. So Oh,
Will Vodak
I’d like to state here that this is great because we’re talking in a very casual setting about the fusion process about how easy it really is. We’re taking a ton of time to go through this. But you can see how quick this process can be. If you do it correctly in repetitive motion, but gearing there’s really nothing to substitute a great training
Garry
No, absolutely not. And we’ve got fantastic trainers all across the country, who can come out and do the do the proper training, the certification, written test, fusion performance test that you have to go through before you get certified on that. And if there’s any projects out there, we highly encourage anybody putting in specifications that they put in certified operators to do the fusion work. Garry,
Will Vodak
I’d like to ask you a couple questions that we weren’t able to touch on because that’s such a time intensive process. A lot of people use solvents like isopropyl alcohol and other cleaners to get that pipe clean. What are your recommendations on on cleaning both maybe the pipe and maybe the heater plate as well. So
Garry
the you know the heater plate has got a Teflon coating on it. If you’re just doing proper day to day maintenance during your Fusion where you’re wiping, wiping those off before you put the heater in each time shouldn’t really have too much issue where you start getting any build up ISCOloration on that it’s maybe the Teflon is getting scratched or nicked. Now you’re down to you know the aluminum of the heater, now you’re going to get pipe that’s going to stick to it that was eventually going to need to be replaced. That’s the neat thing about the the McElroy heaters that they can all those heater plates themselves can all be replaced easily. The as far as the cleaning on the pipe, I’ll only use the isopropyl alcohol if I know that I’ve contaminated touch that pipe. If I had chainsaw oils after cutting that pipe that’s on the pipe surface itself. I’ll take that 96% isopropyl alcohol and wipe the ends of that pipe off. But typically you don’t need it. Because that facing does such a great job of getting down to the clean virgin polyethylene. Yeah.
Will Vodak
Can we go back out to Riverport? Because I think we’re going to we’re going to Eric, you’re you’re very patiently like a bulldog watching that pipe. Cool. How is the cooling process going itself?
Eric Ray
I’m sorry, I heard the Bulldog part and I lost you. You repeat.
Will Vodak
So right now you’re watching that cool. We’re about to take kind of a visual inspection of the pipe itself, Eric. So maybe if we could get back to that pipe? Because we do want to look at kind of a visual inspection. Garry, what are we looking for? When it comes to visual inspection of after the fusion?
Garry
I mean, you know, we talked about that double rollback? Well, we want to look for that making sure the pipe rolls back, you know, those be that fusion B rolls back touches the pipe on both sides of the fusion zone area. You know, we don’t want to do sometimes we’ll see a bead where it doesn’t roll back. It’s it’s cockeyed. It’s stuck up one side, not all the way down. We maybe didn’t use the right pressures, and so forth when fusing that together. Thank you’ve got some pictures there on the slide well that the audience can see some of the things that we’re looking for their uniform
Will Vodak
beads, are they as symmetrical as possible? Are they going all the way back right high V groove not extending more than half the depth of the of the CM learning on this. So
Garry
you are you’re picking up that lingo? Well, here we’re looking at Eric. Eric, how
Will Vodak
has that been looking to you?
We’ve got equal beat widths on both sides. Bead looks great. Everything is centered up. Looks like Eric did it.
Will Vodak
Don’t know about that. But that’s a pretty high compliment. That So Eric, for the sake of our audiences valuable time, let’s go ahead and pretend that we’ve waited the requisite 11 minutes or so of cooling time. At what point would you start to load in your next piece of pipe and how would you get that down the system?
Eric Ray
Yeah, so what we would do first thing is we would unclamp the clamping cylinders and then we would basically release the jobs from the pipe, we would use our pipe lift rollers on each end, we’ve got the fixed side roller, as well as the movable side roller. So you hydraulic cylinder under each one you can lift the pipe up out of the machine. You want to make sure that that that beautiful bead that we just put between those pipes doesn’t get caught between the jobs or the inserts on the way out. So once that pipe is up and supported by the rollers, then you can either On the machine down, and you can track the vehicle down the pipeline. Or if you’ve got to pull in head and you’re going to make runs a pipe, you could go ahead and get your your puller to pull that pipe through until the end of the additional piece is in the fixed job. And then we would want to lower in a new piece to be attached to the run.
Will Vodak
Eric, you’ve done a phenomenal job helping us out today. Thanks to you and your guys out there. Stay put just in case we have any more questions. But Garry, now we’re gonna talk a little bit about the boring stuff like standards. And thanks so much for all your hard work out there and keep up the great stuff.
Garry
Great job, Eric.
Eric Ray
Thank you. Thank you. Thank you guys.
Will Vodak
So Garry, let’s go ahead and talk a little bit more about some of the standards that we referenced, kind of starting with the Holy Grail here of HDPE fusion, which is F 2620. What does that entail? Right? I
Garry Bouvet
I mean, 2620 is a is a fusion guideline, talking about the parameters specific to HDPE. Doesn’t matter what manufacturer, all the pipe manufacturers are on board for all the 4710 resins and we talked about our fusion manual RHCP fusion manual is all geared on f 2620 as the standard basis for our step by step procedures in that fusion manual.
Will Vodak
So there’s not only the fusion manual, there’s that Macalik app that you spoke about earlier, these are both great resources for anybody looking to get into the fusion world. A couple of our customers and clients are on the line here, starting some big jobs coming up. This HDPE fusion manual is a must read. For anybody. It’s really the kind of the Quick Reference Guide for after a training. That is a must to keep it Yeah,
Garry
you’re on that you’re on the job site is a great, there’s a great tool, I use it every day. One of those is attached to every rental machine will that we send out to a job site, we have a future manual attached to that machine. So that that operator has those guys, he can look up what the fusion pressures that he needs for that size, what bead size does he need to have on that pipe size that he’s working with?
Will Vodak
So we’ve also got some quality kind of instruments here that we can use, right? We’ve touched a little bit, I’m a data logger. Would you recommend a data logger for any big job with with HCP fusion?
Garry
I absolutely will it really helps that operator build that consistency in the fusion? Well, it can also alert an operator to a machine problem. He may not even be cognizant that he that he has. We’ve had I’ve been on jobs where the everybody did everything right set the pressures properly. Did the fusion have the data logger on there showed we didn’t few we were about 150 psi less than what was actually set on the gauge has had a cylinder, a leak on one of the seals on the cylinder. So he was losing pressure didn’t even hadn’t had that data logger would have been blind knowing thinking that he did everything right. Absolutely.
Will Vodak
Yeah. Garry, we’ve reached the point in this where I’d love to answer the some of the many questions that we have going here. So let’s keep this kind of as a rapid fire, if you will bring it on set ready, we’ll see how we’ll see how well you. Brandon is asking, is there a difference between using a manual but fusion versus this setup.
Garry
I mean, there’s a difference in the mechanics of the machine. As I stated earlier, your procedures, those seven steps that we talked about, those aren’t going away. It’s just how you achieve those seven steps, you get into the smaller machines, those manual machines, they everything’s done manually, you’re lowing the heater, and you’re pushing the pipe together with with the with the you know, pull bar, you’re you’re doing all the operators doing all of those functions manually. That was what we call a semi automated machine. And we get into other machines, it becomes fully automated. What
Will Vodak
typically is the total amount of time to fuse a joint and let it cool. That’s from Alex,
Garry
again, gonna vary each time by size of pipe, as we talked about those melt times, and those cool times are going to fluctuate based on the size of pipe. So you can go anywhere from you know, five minutes on two inch pipe, you know, to an hour and a half on 36 inch pipe.
Will Vodak
So it’s gonna vary, it’s gonna vary, right? Little pipe Mike, our good friend out in the desert is asking what advancements have been made to make fusion more efficient and help speed up projects.
Garry
Oh my great questions, Sundance. I’m telling you, man, yeah, he’s teed me up for that. So one of the neat things that McElroy has come out with is what we call the ice series. Now right now it’s over only on Some larger machines that have really automated the process, the on that fusion process, that drag calculation that Eric had to go through manually at all done automated automatically on that machine, just hit one button, and it calculates that whole drag and adds a right to your Fusion pressures.
Will Vodak
So one of the neat things are continuing to come out with the fusion process, and optimized cooling, for instance, optimized cooling, right? If these are advancements that are coming out, there’s more information, more data constantly being kind of brought up into the industry, which is helping contractors, clients, owners save time and money in the field, right.
Garry
And that’s where the ISCO getting with their local ISCO RSM out there in their area, we can work with them and help them and show them all these different tools that are available to expedite and efficiently do their fusion projects.
Will Vodak
Great question from Sierra, can this machinery be lowered into a trench? If so how do you do that safely? Garry?
Garry
Nice, Sierra. Great question. So a lot of this equipment is what we call in ditch capable. Now you looked at that machine, it’s on a chassis, it’s got a set of tracks, it’s got the generator, the engine, all in one unit, you don’t really want to try to put that thing in a ditch. But by remove removing a couple of pins, and unlocking that upper works, we can take that upper works off and put it into the trench to do an in ditch fusion, we can even remove one of the stationary jaws and cut it down to a three jaw unit. This guy has also created and has available some what we call limited access machines, where we even got to jaw configuration machines that can go in and do those really, really tight fusion spaces will some places that you’d look at and go, there’s no way you’re doing above fusion there.
Will Vodak
And we do it time and time again, absolutely an extension hose kit, put it in the ditch, it’s also a safer way to do things constantly going back to safety. Absolutely. Mario is asking is a Ben test normally recommended?
Garry
Good question, Mario, that there really depends on size. If, if you’re doing a 48 inch pipe, it’s probably going to be really difficult to do a bend test. As big and strong as I am well. I’m not bending 48 inch in a pipe into a into a bend test. And it’s not very safe. There’s other destructive processes Mario that we can do out in the field with a side bend tester where we can cut small strips off of any size pipe and do the side bend test on that pipe that
Will Vodak
does have an ASTM standard approved with it. You know, Mari I’ve seen on particular jobs where a guided side bend test is specified every Monday. Because that, you know, helps ensure that the guys that made it through the weekend and are back on the job site are you know, remembering how to do it. This is a skill like everything else, and you got to you know, continue to use it to keep good practice. Yeah. So really, Mario, it’s entirely up to the project, we believe if you’ve got a data logger and a certified installer, guided sideband test is is an additional measure that, depending on your level of comfort may or may not be necessary. Yeah,
Garry
I mean, it’s a destructive test. And so if you’re doing one of those, you’re taking a joint that was just completed out of the and then you’ve got to redo that weld. So it’s not like you want to do one on, you know, a lot of welds and we use that guided side bend test, kind of as a spot check, as will pointed out,
Will Vodak
what is the major difference between but fusion and electrofusion carry.
Garry
They both accomplish the same thing will. But fusion, again, is you’re using the machine and you’re melting the two ends electrofusion coupling fuses on the outside of the pipe, the pipe bends are met in the middle of that coupling, but the fusion occurs on the outside of the pipe. So you’re really dependent upon that outside condition of that pipe to properly get a good fusion as well. They both are very work well. They perform they they have the same pressure capacity capabilities on it, but it’s just really the method of how you make that connection.
Will Vodak
Tyler is asking the lowest ambient temperature fusion can take place. Believe it’s 40 degrees under
Garry
I mean, I I’ve done we’ve done some fusions that 30 minus 35 out in the plains of North Dakota, it’s not a lot of fun to be out there doing that but you’re probably going to need a 10 There’s some type of structure to kind of keep the wind and so forth off of it. But you know, minus 40 degrees is kind of the limit for HDPE. Anyway, and so fusion, you’re not going to want to perform under that temperature.
Will Vodak
And really, you want to at that point, if you have to fuse in sub zero conditions, if you have to, you know, using heat blankets around the pipe, sometimes you can bring the pipe ends right up to that heater plate warm up the pipe ends to a little bit more of an ambient temperature right before heating it. So there are some things tighter that can be done, but we’re using pipe all over the world, including up in the Yukon and Alaska where I’ve heard it gets a little cold sometimes. Andrews asking, Does the machine allow you to rotate the pipe for an inspection around the entire fuse joint Garry,
Garry
it does not. So that pipe is not going to rotate in that fusion machine. So your inspection of your pipe needs to occur before you bring it into the machine or you lift it up off your pipe pile or what have you take a look at the pipe ends in the area before you put it in the machine. And oftentimes
Will Vodak
a shaving or ribbon will get caught underneath. So it’s really important to check 360 degrees around that pipe to ensure you’ve got a workable fusion zone. Our good old buddy Anonymous is asking if but fusion machines are used to make fabricated fittings. Good question
Garry
they are. We do it in our shop all the time. Now, it’s not something that we do in the field with the equipment, because it requires special sets of inserts. But we at ASCO, we manufacture all kinds of fittings all kinds of mitered joint connections, we do that in the shop, because we’ve got to sometimes put that pipe in a unique angle that you can’t replicate in the field. So if you need a miter fitting, that’s one of those things that you order from this go and get that beforehand.
Will Vodak
Two more questions here. Anonymous again chiming in thanks for coming on this. Can but fusion be safely performed indoors? Yes, it can. However, you want to make sure that the machine you’re using is not going to provide any exhaust fumes that can make a dangerous situation. So yes, we do but fusion all the time, hooting smock with them, but fusion Garry’s absolutely indoors. But it really just depends on the machine that you’re needing. There is no fume or vapor that comes with the heating of polyethylene nothing
Garry
with the Fusion part. It’s just the gas or diesel engines on the on the machines and no
Will Vodak
flame too. So in some of those applications, where maybe you’re struggling to weld carbon steel or something indoors, HDPE might be a suitable alternative. Garry, this is a great question here. Can you give an example of the calculations for drag pressure we we touched on drag a little bit, but let’s go back and touch on that. So drag is the amount of force it takes from it takes for the pipe to move at all right,
Garry
so we’ve got a movable jaw on that machine. And we’ve got a string of pipe out behind say we’re doing that tie in, we have a weight associated with that string of pipe, we have to calculate what it takes to for that jaw to move with that pipe weight loaded into it. That’s exactly that’s what we are determining. It also can be well, a drag calculation, if we’re on an angle, right, and we’ve got gravity wanting to pull this way we’ve got to fight, you know, gravity to be able to pull that pipe upward against the other stationary end. That’s what we’re trying to calculate is what we can get that whatever we’re fusing to, to move to the other one, and you’re adding that to the total fusion, adding it to the fusion and also your heat soak, right, which we always say is zero. But if you have an associated drag, Eric had it on this one of 60 psi. So there’s we say no pressure for heating, but he actually had 60 on the gauge, just to account for the weight of that pipe hanging out the back end of the machine. Right. Great, great
Will Vodak
explanation there. Garry, I’ve got one last question from the audience. The final poll question here. And we are nearing the end? Because there’s been such good questions. What are the following topics? Are you interested in learning more about in the future? Is it but fusion certification training? Is it questions on our fusion manual and maybe equipment, sales, equipment, rental service related aspects or other fusion support? The reason we’re asking, we’ve got hundreds of ISCO employees passionate about fusion and being able to assist. So please reach out to any one of us. We’d be glad to answer your questions as it relates to fusion. Because there’s simply no way in just an hour, would we be able to cover all of it. So it’s looking like the most amount of people had questions about The Fusion manual which is which is great here, that’s an easy one. Here, once you bring this thing home, who is ISCO? What do we do?
Garry
Right? Well, we we’d be remiss if we didn’t talk about the company that allows us to be here and allows us to present to our clients, ISCO industries. We are the largest HDPE distributor in North America, we have offices and locations all across the United States and Canada, ready to serve you with ACP needs fusion equipment, whether you need new machines, rental machines, fusion technician services training, we can provide that for you wherever you’re at. We have 24 hour fusion support. So if you’re on a job site, something happens, something comes up you’re not sure of, you can call that hotline, we’ll you can get somebody even smarter than us on the fusion side, to help them walk them through on site, that process that they’re dealing with. So, again, we’re this is what we do. We’re passionate about it. This is what all we do. And we want to be able to make sure your jobs go properly and efficiently. And
Will Vodak
perhaps more important Barrow Barrett, follow me here. Let’s send it out to Riverport for one final shot of Bradley Cooper, fusing. I mean, this is the reason why ISCO is what ISCO is because the gentleman like this, Eric, thank you so much again, for your assistance, and support during all this. Garry, more of a George Clooney Robert Redford, we go, thank you. So on behalf of everybody at ISCO industries, please connect with us via these social media channels. There’s one of those QR code. I think that’s what they’re called, you can scan that it’ll take us to our podcast. We’re gonna keep bringing this up and connecting you with information about HDPE. So I hope you’ll follow us on all our platforms and channels. Garry, you’ve made it to an influencer status. Congratulations. Oh, awesome.
Garry
Moving up in the world. Will,
Will Vodak
absolutely. So on behalf of all my colleagues here at ISCO industries, thank you very much for joining us today to learn about but fusion if you have any questions, feel free to reach out to us. In the meantime, stay safe as always and happy fusing. We’ll see you next time on ISCO insights.
Access our deep HDPE knowledge
field-reports
Large-Diameter HDPE Pipe to Solve Northern Colorado’s Long-Term Water Supply Challenge
FrontRange H2O Partners selected ISCO as the HDPE pipe supplier for the Vita H2O Project,...

field-reports
Cotino Bay Lagoon Infrastructure
35,000+ LF of HDPE pipe installed for lagoon infrastructure in Rancho Mirage. See how ISCO...
field-reports
24-Inch HDPE Water Main Emergency Repair
When a critical 24-inch domestic water main serving Texas A&M University developed a leak, ISCO...